How To SSH To Raspberry Pi From Anywhere: A Guide
Can you truly wield the power of your Raspberry Pi from the far reaches of the digital world? The answer, emphatically, is yes. Secure and seamless SSH access to your Raspberry Pi, regardless of your physical location, is not just a possibility its a readily achievable reality. This article delves into the practical steps and necessary considerations to unlock this capability, empowering you to control your miniature marvel from virtually anywhere.
The digital frontier has expanded exponentially, and with it, the need for remote access to our devices. Whether you're a seasoned tech enthusiast, a student delving into the world of embedded systems, or simply someone eager to experiment with the versatility of a Raspberry Pi, the ability to establish a secure SSH connection from any corner of the globe is an invaluable asset. Imagine troubleshooting your home automation system while on vacation, or remotely accessing your Raspberry Pi-powered server from a coffee shop miles away. The possibilities are as vast as the internet itself.
Before we dive into the how-to, let's address the fundamental question: what exactly is SSH, and why is it so crucial for remote access? SSH, or Secure Shell, is a cryptographic network protocol that provides a secure channel for remote login and command execution. Think of it as a fortified tunnel through which you can send commands and receive information from your Raspberry Pi, all while ensuring the confidentiality and integrity of the data exchanged. Unlike less secure methods, SSH encrypts all communication, protecting your sensitive information from prying eyes.
Now, let's move on to the practical steps. The core of enabling remote SSH access to your Raspberry Pi involves a combination of configuring your network, installing necessary software, and understanding the nuances of port forwarding. The journey, while not overly complex, requires a degree of technical understanding and careful execution.
The first step in this intricate dance is to procure the necessary equipment. This may sound obvious, but ensuring you have the correct set-up is pivotal to ensuring that your project is a success. The prerequisites for remote SSH access are simple, but necessary. First and foremost, youll need a Raspberry Pi. Any model will suffice, but of course, newer models offer improved performance. A compatible power supply is also crucial; a stable power supply is vital for the smooth operation of your Pi. Finally, you'll need a proper SSH client. PuTTY on Windows, or the built-in terminal on macOS and Linux, are some examples. Now, lets dive in and provide a step-by-step guide to achieving this level of control.
When you get a Raspberry Pi, it will display the name "raspberrypi" by default. However, you can easily change this name in the configuration settings. This can be useful if you have multiple Raspberry Pis on your network, allowing you to distinguish between them.
Once your Raspberry Pi is set up and connected to your network, the first step is to ensure SSH is enabled. The default configuration often has SSH disabled for security reasons. You will need to enable it using your Raspberry Pi's configuration tool or by manually editing configuration files. It's a quick and painless process, and the benefits are well worth the effort.
Next, you will need to identify the IP address of your Raspberry Pi. This is the unique identifier that allows your computer to find your Pi on the network. You can find the IP address by entering the command `ifconfig` on the Raspberry Pi terminal. Once you have the IP address, make a note of it; you will need it later.
For remote access, you'll often need to use port forwarding on your router. This involves directing incoming traffic on a specific port (typically port 22 for SSH) to the IP address of your Raspberry Pi. This process varies depending on your router's make and model, but the general principle remains the same: you need to configure your router to forward traffic from the outside world to your Raspberry Pi's internal IP address. Consult your router's manual for detailed instructions on how to do this. Many guides are available online, demonstrating how to configure specific routers.
As we journey through this setup, another essential component comes into play: the SSH client. This is the software you'll use on your computer to connect to your Raspberry Pi. For Windows users, PuTTY is a popular and readily available option. For macOS and Linux users, the built-in terminal application provides a convenient SSH client. When you start a connection you now connect to raspberry pi via remote.it.
If you're connecting from outside your local network, you will need to configure your router to forward traffic on port 22 (the default port for SSH) to the IP address of your Raspberry Pi. You will also need to know your public IP address, which is the IP address assigned to your router by your internet service provider. You can find this by going to that router settings page we went to before, and looking under router status (make sure you're still connecting to port 22 in putty, by the way).
To connect to your Raspberry Pi using ssh, follow these steps:
- Open a terminal window on your computer.
- Enter the following command to ssh into your raspberry pi:
- Ssh pi@ replace ` with the ip address of your raspberry pi.
Once you've successfully configured your network and set up your SSH client, you can begin testing your connection. Open your SSH client, enter your Raspberry Pi's IP address (or your router's public IP address if connecting remotely), and provide your username and password when prompted. If everything is configured correctly, you should be greeted with a command prompt, giving you full control over your Raspberry Pi.
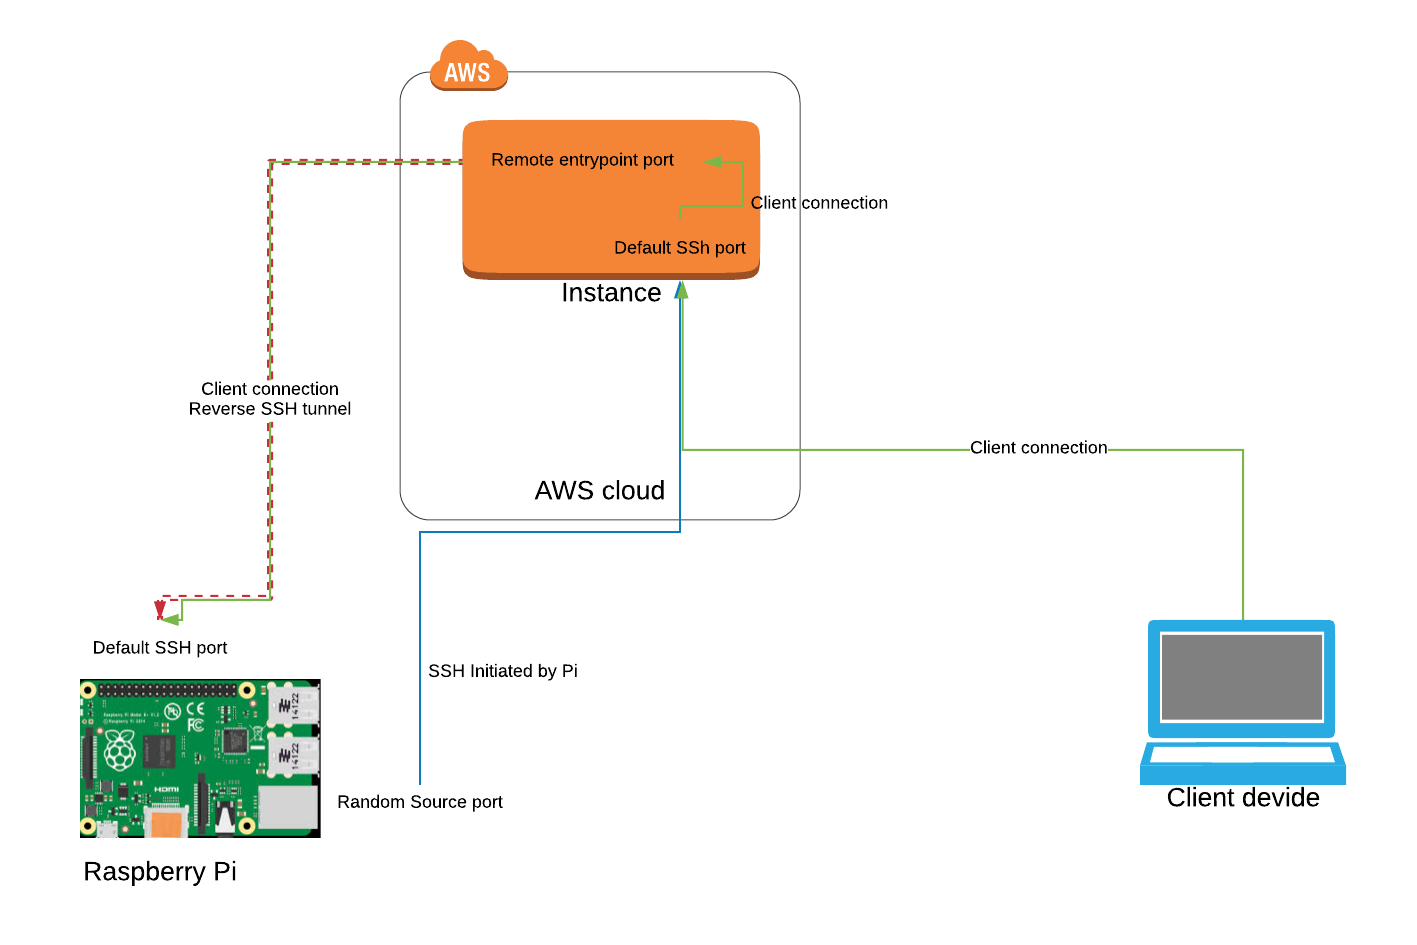
If you find yourself wrestling with the intricacies of network configuration, don't despair. There are alternative methods for achieving remote access. Services like remote.it can greatly simplify the process, eliminating the need for complex port forwarding configurations. Click register again to add raspberry pi to your remote.it account. Start a connection you now connect to raspberry pi via remote.it.
These services typically provide a secure tunnel through which you can connect to your Raspberry Pi, effectively bypassing the need to open ports on your router. This approach can be particularly useful if you lack experience in network configuration or if your internet service provider restricts access to certain ports.
To set up remote SSH access to a Raspberry Pi, you will need a Raspberry Pi, a compatible power supply, and a proper SSH client. This allows users to remotely access and control their Raspberry Pi from anywhere in the world, as long as they have an internet connection. This allows for seamless operation, regardless of your location. To add another public hostname to your tunnel, you simply need to click on that vertical 3 dots icon and choose configure, then go to public hostname tab and click on add a public. This is a simple process and can be useful for your personal configuration.
For those new to the Raspberry Pi, or to those who want to expand the capabilities of their Pi, the ability to connect from anywhere is a game changer. Remote access opens the door to a realm of creative potential and useful functions. Imagine your home automation system, or your ability to monitor your network, even when you are away. The Raspberry Pi, with SSH capabilities, will empower you to do everything you need to do.
When using an SSH client like PuTTY, ensure you are still connecting to port 22 to maintain a secure connection. This port is the standard for SSH communication and should remain consistent to avoid any connectivity issues.
As you configure your system, remember that the security of your Raspberry Pi is paramount. Use strong passwords, and consider disabling password-based authentication in favor of SSH keys for enhanced security. Regular updates of your Raspberry Pi's operating system and software are also crucial to patch any security vulnerabilities that may arise.
The journey to remote SSH access may present a few challenges, but with the right knowledge and a little perseverance, you'll be rewarded with a powerful and versatile tool. By securing your Raspberry Pi with SSH access, you will be able to use it at any time and from any place.

![ssh into raspberry pi from anywhere [3 easy steps]](https://tunnelin.com/wp-content/uploads/2020/06/raspberry_pi_ssh.png)
