Connect Your Raspberry Pi Behind A Router: Easy Guide!
Is the prospect of remotely accessing your Raspberry Pi, nestled behind a router, giving you pause? Rest assured, the process is far more accessible than it might initially appear, opening up a world of possibilities for both seasoned developers and curious newcomers.
We're often told that connecting a Raspberry Pi behind a router is an intricate dance of technical configurations, a realm best left to seasoned network engineers. But what if the reality was considerably simpler? In this discourse, we'll dismantle the complexities, guiding you through the necessary steps with clarity and precision, eliminating the intimidating technical jargon that often obscures the process. The goal is to equip you with the knowledge to remotely manage and control your Raspberry Pi, regardless of your location or technical background.
This guide will illuminate the path, whether you are an experienced developer or just beginning your journey into the world of Raspberry Pi. It will provide you with the necessary tools to understand the underlying principles and practical strategies needed to connect your Raspberry Pi behind a router, even if it is behind a NAT or CGNAT router, and provide secure remote access.
Accessing your Raspberry Pi remotely from anywhere in the world is no longer a futuristic luxury; it's fast becoming an essential skill. Think of the convenience of overseeing servers, automating home devices, or developing intricate IoT projects all from the comfort of your favorite chair, or even from a different continent. Understanding how to securely connect to your Raspberry Pi behind a router is the crucial first step to unlocking these possibilities.
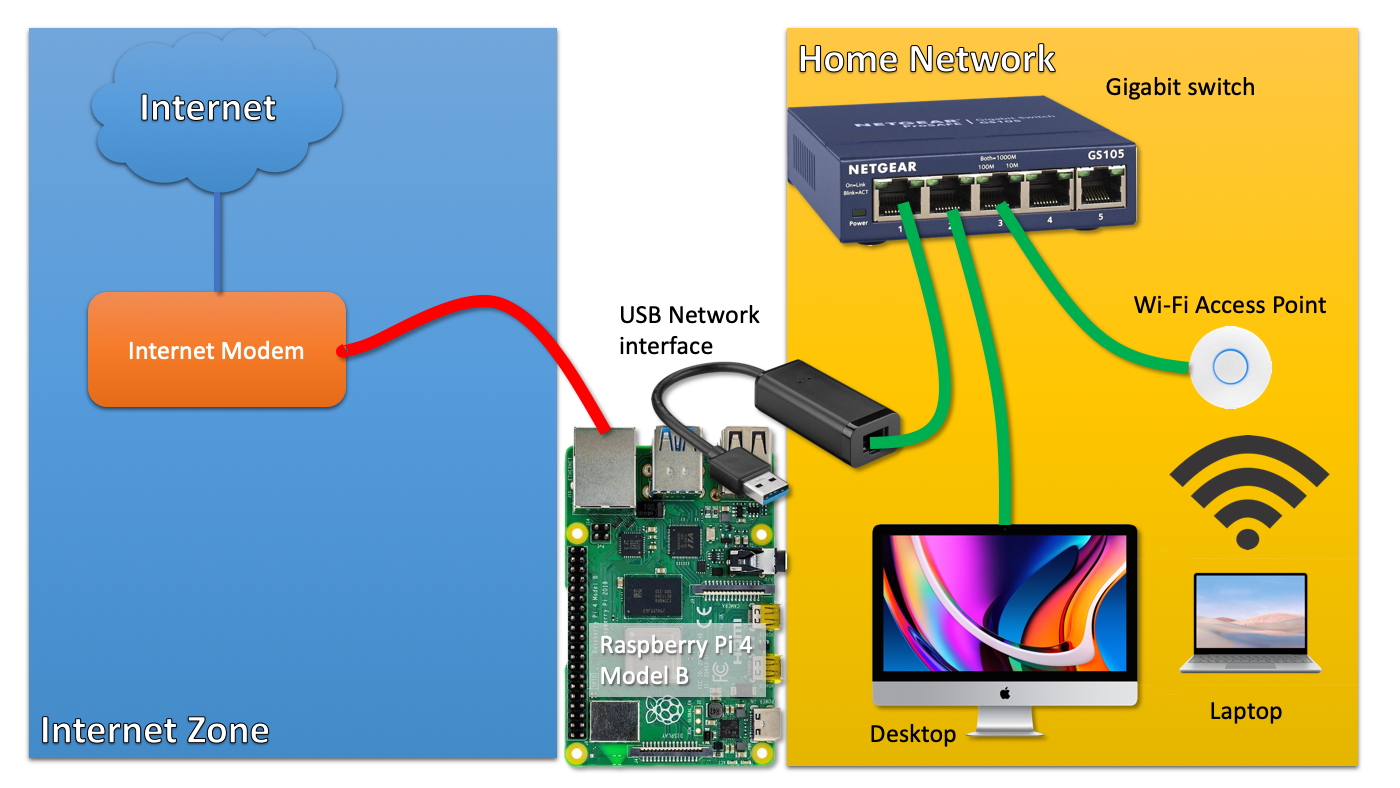
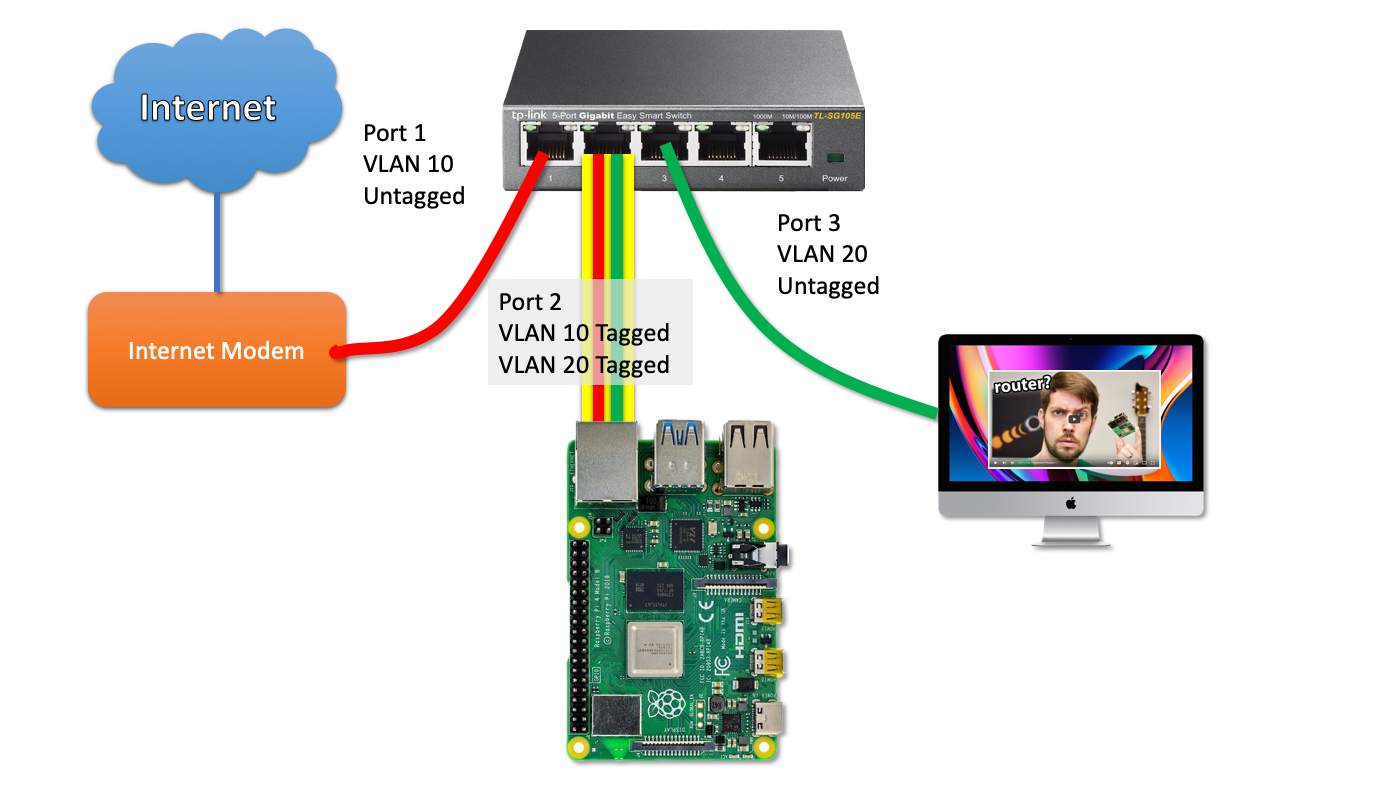
The challenge often lies in navigating the intricacies of network configurations. When your Raspberry Pi is behind a router, gaining access typically involves setting up port forwarding. But there are alternative methods, offering greater security and ease of use. In this tutorial, we will explore one such method, allowing you to remotely access your Raspberry Pi even when it's concealed behind a router or firewall.
One effective strategy involves an agent that runs on the Raspberry Pi and maintains a persistent connection to a shared public server. This approach bypasses the need for direct port forwarding, making it a more streamlined and often secure solution. This article will guide you through the setup process, providing practical instructions and helpful insights.
The process, simplified and demystified, transforms what might seem daunting into an achievable task. In the upcoming sections, we will present step-by-step instructions, ensuring you don't feel lost in the technical complexities. We will provide you the tools to confidently connect your Raspberry Pi, unlocking a wealth of applications from remote server management to cutting-edge IoT development.
This guide simplifies the complexities that once surrounded Raspberry Pi remote access. Forget the endless technical jargon. This is about enabling you to manage your devices with ease.
Let's proceed to a table that will summarize the essential aspects of securely connecting a Raspberry Pi behind a router:
| Aspect | Details |
|---|---|
| The Core Problem | Raspberry Pis behind routers are difficult to reach because of network address translation (NAT) and firewalls. Direct connections are blocked. |
| Traditional Solutions (and their issues) | Port forwarding is the traditional method. It can be complex and often less secure, especially if not configured correctly. It can also be challenging to manage, especially when dealing with corporate firewalls. |
| Modern Solutions | Using agents and persistent connections to a shared public server, bypassing the need for port forwarding, increases security and is easier to manage. |
| Key Benefits of Remote Access | Remote access offers a wide variety of benefits, including server administration, home automation, and IoT projects. |
| Key Concepts | Understanding the concept of agents and persistent connections is important for grasping the methods being discussed. |
| Security Considerations | Encryption is vital. Secure configurations should be used to protect your Raspberry Pi from unwanted access. |
| Use Cases | From server management to IoT projects and home automation, the possibilities are vast. |
| Ease of Use | The approach is streamlined to ensure that its easy to configure and use, making it suitable for all skill levels. |
| Target Audience | The guide is intended for beginners and experienced developers who wish to control their Raspberry Pi remotely. |
| Practical Steps | This guide provides practical step-by-step instructions and solutions to get your Raspberry Pi connected remotely. |
It's important to remember that security is paramount. The methods discussed will also touch upon essential security configurations to protect your Raspberry Pi from unauthorized access.
Navigating firewalls can be challenging, especially when your Raspberry Pi sits behind a corporate firewall that restricts SSH or VNC connections. The methods described here provide alternative ways to bypass these restrictions, allowing remote management even in restricted network environments.
This approach offers a more streamlined and often more secure method for accessing your Raspberry Pi. Forget the complexity of port forwarding, this guide will show you how to easily connect to your raspberry pi if it is behind a NAT or CGNAT router.
Changing the VPN or firewall configuration can be very difficult when your Raspberry Pi is behind a corporate firewall that does not allow SSH or VNC connections. To solve this, the methods discussed here will show you how to access your Raspberry Pi remotely and securely.
This quick guide will help you manage and control a fleet of Raspberry Pis remotely over the cloud easily! The methods described here offer a very efficient way to access and manage multiple Raspberry Pis.
This method of accessing your Raspberry Pi also enables you to control a fleet of Raspberry Pis over the cloud easily.
With the methods detailed here, accessing your Raspberry Pi behind a router or firewall remotely is simplified. No need for complicated setups, only easy and effective steps.
The world of the Raspberry Pi is about to open up for you, now that you can control it from anywhere in the world!
This guide will walk you through every detail to make sure you understand and make the most of your Raspberry Pi.
Even if you're a beginner or an experienced developer, this guide will show you all you need to know to set up a Raspberry Pi behind a router.
By understanding the processes detailed here, you'll unlock the ability to manage servers, automate home devices, and develop exciting IoT projects.
Now, let's delve into the step-by-step process. While the specific implementation may vary depending on your chosen method and service, the core principles remain consistent.
First, you'll need to choose a service or software that facilitates remote access. Several options are available, ranging from open-source projects to commercial solutions. Consider factors like security, ease of use, and pricing when making your decision.
Once you've selected a service, the next step involves installing the necessary agent or software on your Raspberry Pi. This typically involves downloading the software package, running the installation script, and configuring it according to the service's instructions.
After installation, you'll need to configure the agent to connect to the public server. This configuration usually involves providing your account credentials or generating an API key. The specific settings will depend on the service you've chosen.
Next, you'll need to set up any necessary firewall rules on your Raspberry Pi. This typically involves opening the ports that the agent uses to communicate with the public server. Consult the documentation for the specific service you're using to determine the required ports.
With the agent installed, configured, and the firewall rules in place, your Raspberry Pi should now be able to establish a persistent connection to the public server. You can then access your Raspberry Pi from any device with an internet connection, without the need for port forwarding or complex network configurations.
Securing your connection is very important, and steps should be taken to protect your data. Employing strong passwords, enabling two-factor authentication, and keeping your software up-to-date can help protect your device from unauthorized access. Always review the security guidelines of the chosen service and follow its recommendations.
The key advantage of this approach is the ability to bypass the need for port forwarding. This greatly simplifies the setup process, especially if your Raspberry Pi is behind a router with a complex or restrictive network configuration.
This approach is highly effective, in that an agent that runs on the Raspberry Pi maintains a constant connection to a shared public server. This eliminates the need for you to manually configure port forwarding on your router.
The agent ensures a stable connection, enabling remote access from anywhere in the world, regardless of the network conditions.
The method offers ease of management. You'll be able to easily manage and control a fleet of Raspberry Pis over the cloud.
The methods described in this guide, empower you to securely connect to your Raspberry Pi or IoT device remotely over the internet without the need for port forwarding. You will find that it is easier to set up and use.
Remember, whether you're a beginner or an experienced developer, this guide will walk you through everything you need to know about setting up a Raspberry Pi behind a router.
You will gain a better understanding of how to securely connect to your Raspberry Pi, which is an essential skill for tech enthusiasts and professionals alike.
It's a skill that opens doors to diverse possibilities from managing servers to automating home devices or developing IoT projects. Understanding how to securely connect to your Raspberry Pi behind a router is crucial.
This quick guide will help you remotely manage and control a fleet of Raspberry Pis over the cloud easily.
Consider these factors when choosing a remote access solution: Does it offer end-to-end encryption? Does it support two-factor authentication? Are the servers geographically distributed to minimize latency? Choose the solution that best fits your security needs and technical expertise.
The power of your Raspberry Pi, even when hidden behind a router, is waiting to be unleashed. No more restricted access manage your projects from any corner of the globe.
You're now equipped with the necessary knowledge to conquer the challenge. Go forth and explore the possibilities!

